Husband was having issues getting up and down to wipe after going number two. The solution was to get a bidet. After looking at the different models we chose the Alpha Bidet JX2 self cleaning nozzle model.
Husband loves it.
------- Assembly Instructions for the ALPHA BIDET JX2 -------
[ skim and look at pictures then start reading what you'll need]
Before you start you may need to BUY a few items that do NOT come with your bidet.
1. Bidet needs to be plugged in, so find the closest outlet and make sure you have an extension cord with a 3 prong plug that can reach your outlet. Record the length of extension cord you will need to buy if you don't have one.
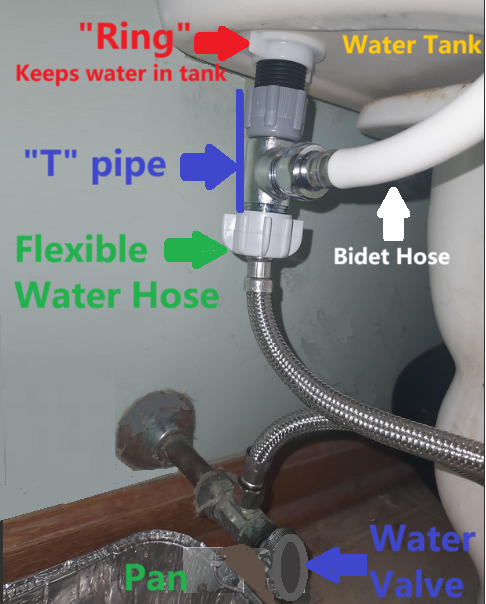
2. Behind your toilet is a water valve (see below pic)
above the water valve is either a one length pipe -or- a hose to go up to your water tank. If you have a flexible hose great but if you have a pipe you will need to buy a flexible hose the length from your valve to the water tank. If you need a hose you can take the pipe with you so you get the right connection size at each end.
3. Pan to place under the water valve while you are working on it and capture leaking water.
4. Monkey wrench to loosen valves in the back of your toilet
5. Disposable cup to help get rid of water in the water tank (behind the toilet you sit on.
Once you have the above items, then you can start the project.
First, take all unnecessary items out from around your toilet (plunger, toilet brushes).
Remove the old toilet seat 
Add a pan under the water valve and take off the water tank top.
Turn off the water valve then flush the toilet a few times. Once you see that flushing does not change the water level in the toilet then you can get a disposable cup and use it to get water level down to just a few inches.
At this point you need to unscrew the "ring" (loosen it slowly, see below pic) under the water tank connecting to the pipe or hose connected to the valve. This is when the remaining water will empty from the tank. So remove the ring slowly and when the pan is almost full you can tighten the ring, empty the pan, readd the pan on the floor under the valve then re-loosen the ring. Repeat this process until the water is empty from the tank.
NOW you can start to add the new bidet parts.
Add the rectangular plastic bidet plate on top of the toilet holes where old toilet seat was attached. The arrow should be pointed forward toward where you sit down (not toward the water tank).
Unscrew the nuts and parts from the 2 plastic screws that came with the bidet.
Add the brackets to properly space the bolts, then add the bolts so the square plastic top is holding the bidet plate to the toilet.
Then add the grommets, washers and nuts to the underside of the toilet. Use your hands and make sure they are on tight. Then slide the bidet seat on until it clicks into place.
Connect Plumbing

A.) If you have a straight pipe connecting your water tank to the water valve:
Fully remove the water pipe. Keep the ring that sits next to the water tank. Then add the newly purchased flexible hose to the bottom of the area (just above the water valve). Then add the top of the hose to the bottom of the small "T" valve pipe that comes with the bidet. The top of the vertical "T" valve pipe connects to the water tank (Keep the ring that sits next to the tank).
B.) If you have a flexible water hose connecting your water tank to the water valve:
Disconnect only the top portion of the hose (keep the ring that sits next to the tank). Add the "T" valve pipe top to the tank, then the bottom of the "T" valve pipe to the top of the hose.
The middle, horizontal part of the "T" valve pipe connects to the straight end of the bidet hose.
Add the bent end hose connection to the side of the bidet seat. Use your hands and make sure both ends are tight.
Now you want to make sure all your connections to the water valve and small "T" valve pipe are all tight and that the empty pan is under the water valve. Slowly open the water valve. If water starts seeping out then close the water valve and tighten the connections between hose, "T" valve pipe, bidet hose and ring under the water tank. You may need to unscrew and reattach properly, tighten then try opening the water valve. Once nothing is leaking you can flush the toilet 5 times. Wait in between each flush for the tank to fill. If the tank starts to leak you may need to tighten the "ring" under the tank. Once the toilet is flushing without the leaking you can plug in the bidet using the extension cord if you need it.
It is at this point you can test the bidet function by adding batteries to the remote, sitting on the toilet and trying the different functions.
Leaving the pan under the valve for 24 hours to make sure there is no residual leaks would be a good idea. If the bidet is not functioning correctly ie for some crazy reason it will not shut off worse case scenario you just unplug it.
We had NO issues with our bidet and it works great.
Share:
Holiday Donation Idea
Improve Balance and Reduce Falls